


The sequence settings in Premiere Pro can be very intimidating to new editors. Don’t feel bad! Many professional and experienced video editors find Premiere Pro’s sequence settings confusing, too. So don’t panic if you’re struggling with this — you’re most definitely not alone.
Familiarizing yourself with the sequence settings can save time and help mitigate issues when it comes to exporting. The good news is that Motion Array is here to help walk you through the simplest ways to create the right sequence for your project. And if you regularly make the same type of content, you’ll most likely stick to the same settings. Luckily, you can save your favorites as a custom sequence, too.
Let’s dive in!

Summary
Part 1: What is a sequence in Premiere Pro?
Before you start with the best sequence settings for Premiere Pro, let’s answer two key questions:
- What are sequence settings?
- How will sequence settings in Premiere Pro help you?
The editing sequence is where video clips are arranged and built into your story. How you set this up will decide several things about your final edited piece.
The most obvious of these are the video’s size and aspect ratio. You’re probably familiar with terms such as 1080p, 720p, and 16:9 or 1:1. Choosing the right aspect ratio for a project is essential. It determines the space around the video’s focus and so can change mood and tone a lot. You can learn more about the importance of video resolution as well.
Before editing, you must define your sequence settings in Premiere Pro. What you choose often depends on the format in which you wish to export your project. For example, you might need the final clip to be square for sharing on Instagram or horizontal for Facebook. You might also need to use specific settings for the camera used and the frame rate of your footage.
So, there isn’t just one best sequence setting for Premiere Pro, it’s a matter of matching your needs, the platform, and your creative vision.
Sequence presets overview
The output you want to achieve will determine the Premiere Pro sequence settings you choose. For example, if you regularly work on projects for social media sharing, you’ll likely need to use the same settings each time.
While this chart is a great shorthand for some of the most commonly used sequence settings, don’t feel confined by it. As you get more advanced in your editing, you will find more opportunities to use the other sequence settings in Premiere Pro.
Remember, something as simple as an aspect ratio tweak can change the tone and mood of a piece completely. You can also play with Premiere Pro sequence settings to draw the viewer’s eye to where you need it.
| Best Settings For | Timebase* | Frame Size | Aspect Ratio |
| YouTube HD | 23.976 | 1080×1920 | 16:9 |
| Instagram HD (Square) | 23.976 | 1080×1080 | 1:1 |
| Instagram Stories HD (portrait) | 23.976 | 1920×1080 | 9:16 |
| UHD / 4K | 23.976 | 2160×3840 | 16:9 |
*The timebase settings are for your frames per second, and can be changed depending on how you want the footage to look. Motion Array recommends 23.976 fps as it gives a cinematic feel to your video. Use the same frame rate as the source footage for the best results.
Part 2: How to get the right sequence settings
Fortunately, Premiere Pro has 2 ways to ensure the sequence settings match your footage settings without you needing to customize them. It’s an easy way to figure out the best sequence settings for Premiere Pro for your project. When in doubt, match the source footage.
1. Create a sequence from a clip
This method is the easiest way to ensure your sequence and clip settings match. It can also be a great way to organize your projects, so long as you intend to export your video using the same shooting settings as your footage.
- Create a new Project and import your footage.
- In the Project Browser, select a clip.
- Right-click on the clip, and choose New Sequence from Clip.
2. Add a clip to an empty timeline
If you’ve already created a sequence but are unsure if it has the right settings for your footage, Premiere Pro will tell you if they’re mismatched. Remember, you can organize your timelines to help you work more efficiently, too.
- Create a new Sequence using any settings or open an existing project.
- Find a clip in your Project Browser and drag it to the Timeline panel.
- Premiere Pro will notify you if they don’t match and give you two options: keep the sequence settings as they are or change them to match the clip.
- Select Change the Sequence to match the clip, and your settings will update.
Part 3: How to customize your sequence settings
Suppose you’re working with multiple video formats or want to input your own settings rather than relying on your clips. In this case, you can customize your Premiere Pro sequence settings before you begin editing. This makes choosing the best sequence settings for Premiere Pro easier for similar projects in the future.
Custom sequence settings in Premiere Pro are helpful for many reasons, including:
- Optimizing for different platforms,
- Matching source footage,
- Improving editing performance,
- Streamlining export quality and ease, and
- Achieving creative goals.
Step 1: Create a custom sequence
The first step is to decide what Premiere Pro sequence settings to use. The table at the top of this tutorial lists the most common sequence settings and why they are used.
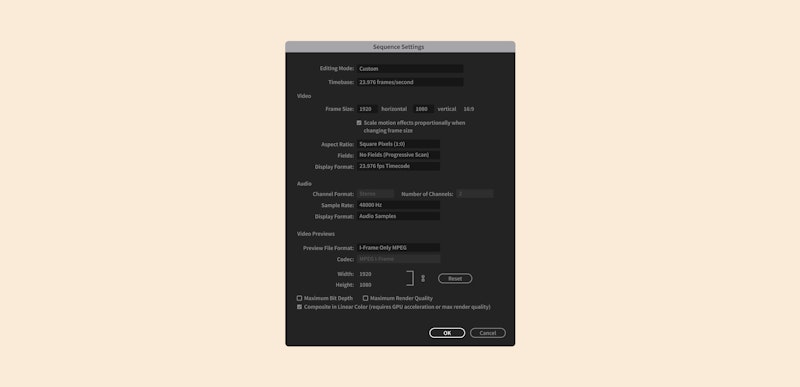
- Go to File > New > Sequence (or press Cmd+N or Ctrl+N) to open the settings window.
- Select Settings at the top tab.
- In the editing mode, select Custom.
- Change your Timebase and Frame Size settings.
- Ensure your Pixel Aspect Ratio is Square Pixels.
- Check your Preview File Format is set to I-Frame Only MPEG.
- If you want to use this new sequence straight away, give it a Sequence Name and click OK.
Step 2: Saving your sequence as a preset
Once you know your most regularly used Premiere Pro sequence settings, you can create custom presets to save time when setting up a new sequence. This will help you work smarter, not harder, in future.
- Follow the steps to create a custom sequence.
- When you’re ready, click Save Preset.
- Select a name for your preset, give it a Description, and click OK.
- Premiere Pro will then reload all of the Sequence Settings.
- Find the Custom folder, and select your preset.
- Name the sequence and click OK. You’re now ready to edit.
Part 4: Working with multiple sequence settings
Some projects might need multiple sequence settings, especially if you want to export in different formats. For example, you may need to export the same video in 1920x1080p for YouTube and 1080x1080p for Instagram.
In this situation, you can change the export preferences, and the video will be cropped accordingly. However, this might mean your clips and titles could be better framed. You can change the Premiere Pro sequence settings to adjust your clips in cases like this.
Step 1: Edit and duplicate your YouTube sequence
Since your 1080x1920p version of the video will show more of the footage than the square format, edit this version first. Here’s how to do it:
- Once you’ve finished your editing, find the sequence in the project browser.
- Right-click and select Duplicate Sequence.
- Rename the Sequence and double-click to open it.
Step 2: Adjust your sequence settings
- With the new sequence open in the project, go to Sequence > Sequence Settings.
- Change the sequence to the new settings (for example, changing the frame size) and hit OK.
- Adjust the footage in the sequence for the framing you want.
- You now have 2 sequences containing the same video, ready to export in the formats you need. You can create as many different sequences as you need in a project. Remember to name them so you know what they are.
While Premiere Pro’s sequence settings can be tricky to navigate, hopefully, you now have the tools you need to master them. Despite the many options available, you’ll likely only need to use a handful regularly. Remember, there’s no single best sequence setting for Premiere Pro. It’s a matter of matching it to the needs of the project.
Now that Motion Array has shown you how to customize your sequences and your most frequently used settings, you can edit away, safe in the knowledge that the settings your project is built on are correct.


